 Skip to content
Struggling to understand the extra charges on your PCB manufacturing quote? These one-time fees, called NRE, can be confusing and add unexpected costs to your project budget.
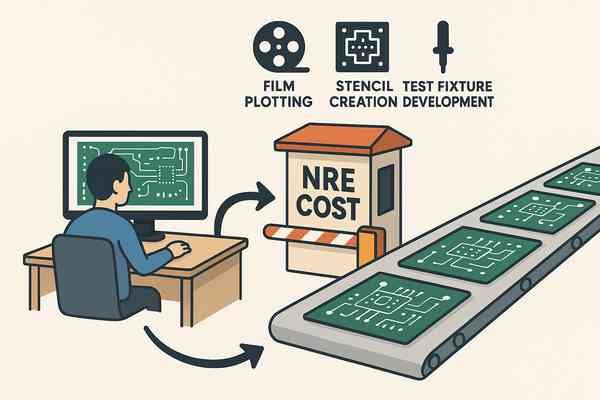
Non-Recurring Engineering (NRE) cost is a one-time charge from a PCB manufacturer to cover the custom tooling and setup required for your specific board design. It includes expenses for things like film plotting, stencil creation, and test fixture development, which are not part of the per-unit price.
Getting your first PCB quote can be a shock. You see the per-board price, which seems reasonable, and then a list of additional fees under a line item called "NRE." In my early days as an engineer, I remember getting a quote for a prototype run and thinking the NRE was a mistake. It seemed like a huge cost for just a few boards. This article will break down what these costs are, why they exist, and how you can manage them effectively, so you can avoid surprises and budget your projects more accurately.
What Is Included in the NRE Cost for PCB Fabrication?
Wondering what you're actually paying for in that fabrication NRE fee? It’s not just an arbitrary charge; it covers tangible setup tasks and physical tools made just for your design.
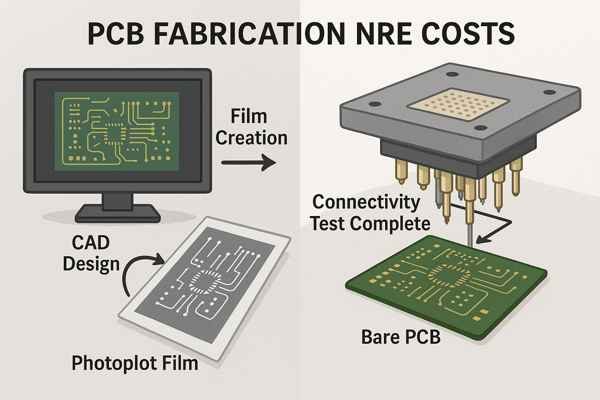
PCB fabrication NRE covers the costs of creating the specific tools needed to manufacture your bare board. This primarily includes photoplotting for generating the films of your PCB layers and the electrical test fixture required to verify connectivity on the finished boards.
To really understand this, let's break down the two main components. The cost isn't just for materials; it's for the precision engineering required to turn your digital file into a physical manufacturing guide.
Phototool Generation
The largest part of this NRE is creating the phototools. Traditionally, these are high-resolution films of your copper layers, solder mask, and silkscreen, plotted by a laser with resolutions often better than 25 microns (${\mu}m$). Some advanced fabs now use Laser Direct Imaging (LDI), which "draws" the image directly onto the photo-sensitive resist on the panel, bypassing the need for film. While LDI can offer higher precision, the NRE cost structure often remains as it still requires significant data preparation and machine setup for each unique layer. The more layers your board has, the more films or LDI setups are needed, directly increasing the cost.
Electrical Test Fixture
The second major cost is the E-Test fixture. For prototypes, a "flying probe" test is common. This involves no custom fixture, but the NRE covers the engineering time to program the machine's probes to test every net on the board. For production, a "bed-of-nails" fixture is built. This is a custom plate with precisely placed "pogo pins" that make contact with every test point. The cost escalates with complexity. A double-sided board requires a more complex "clam-shell" fixture. A board with a high-density BGA might require over 1,000 pins, and the fixture cost can easily exceed $1,500, as defined by IPC-9252 standards for fixture-based testing.
| NRE Component | Typical Cost Range (for a standard 100x100mm board) | Key Cost Driver |
|---|---|---|
| Phototools (Film) | $50 - $150 (2-4 layers) | Number of PCB layers |
| Phototools (Film) | $200 - $500+ (8-12 layers) | Number of PCB layers |
| Electrical Test Setup/Fixture | $50 - $1,500+ | Board density, net count, BGA presence |
What Is the Difference Between NRE for PCB Fabrication and PCB Assembly?
Confused why there are separate NRE charges for making the board and putting parts on it? They cover different processes and require entirely different sets of tools and preparation.
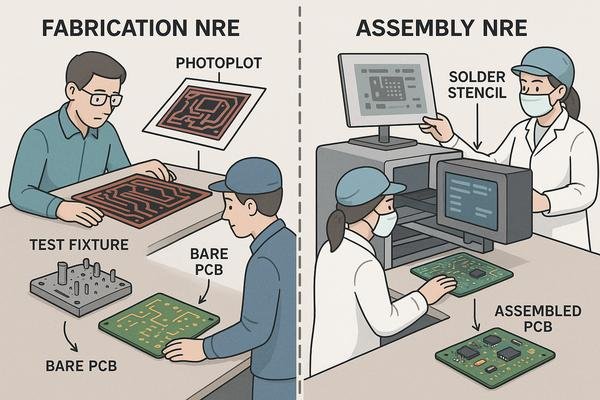
Fabrication NRE pays for tooling to create the bare board, such as photoplots and an electrical test fixture. Assembly (PCBA) NRE covers the setup for soldering components, mainly the solder paste stencil and pick-and-place machine programming.
The distinction becomes clearer when you think about the expertise and equipment involved. The two processes happen in different parts of the factory, often by completely different teams with specialized skills.
Fabrication Tooling Focus
Fabrication is a chemical and mechanical process. The NRE pays for tooling that helps etch copper, drill holes, and print layers onto the laminate material. The key skills involve photolithography1, lamination, and electrical testing of the bare board. The deliverable you pay for is a set of high-precision films and a test fixture. The goal is to create a board that perfectly matches the copper and drill patterns in your Gerber files. This is a purely structural process.
Assembly Setup Focus
Assembly is a logistical and robotic process. The NRE here pays for the tools and programming needed to place components accurately. This involves creating a stencil for solder paste application and programming complex pick-and-place machines. The key skill is interpreting your Bill of Materials (BOM)2 and component placement file (CPL) to create a precise, repeatable automated process. The main goal is to correctly solder every component in the right location and orientation.
| NRE Type | Primary Deliverable | Core Process | Key Cost Driver |
|---|---|---|---|
| Fabrication | Phototools, E-Test Fixture | Chemical/Mechanical | Layer count, board complexity, hole density |
| Assembly | Solder Paste Stencil, PnP Program | Robotic/Logistical | Component count, component pitch, BOM size |
What Are the Typical Components of a PCB Assembly NRE Quote?
Ever wonder what makes up the NRE for putting parts on your PCB? It’s more than just the stencil; it includes programming, setup, and sometimes even unique tooling.
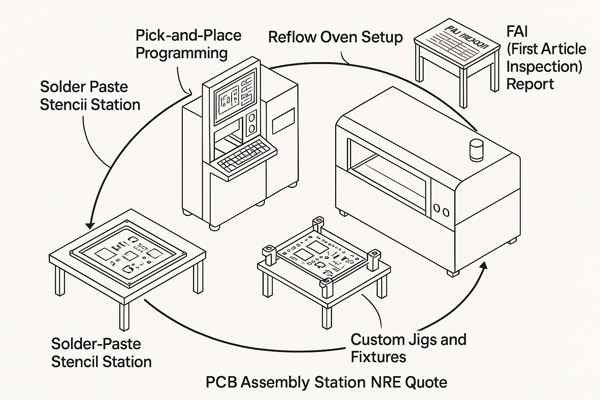
A typical PCB assembly NRE quote includes the solder paste stencil, programming for pick-and-place machines, setup for reflow ovens, and sometimes custom jigs or fixtures to hold the board securely during assembly. First Article Inspection (FAI) reports are also often included.
Let's dissect a standard assembly NRE quote. Understanding these items helps you see where the money goes and why a complex assembly costs more to set up than a simple one.
The Solder Paste Stencil
This is almost always the largest single cost. It's not just a sheet of metal; it's a high-precision tool. For designs with very fine-pitch components (e.g., 0.4mm pitch BGAs), a standard laser-cut stencil isn't enough. You may need one with electro-polished trapezoidal apertures and a nano-coating to ensure consistent paste release and prevent defects. If your board has both tiny components and large ones needing more paste, you might even need a "step-stencil" with multiple thicknesses, which significantly increases its cost. These premium features can push a stencil's NRE from $150 to over $600.
Machine Programming & Setup
This covers the engineering time needed to prepare for the automated assembly. It includes programming the pick-and-place (PnP) machine with the X-Y coordinates and rotation of every component. It also includes setting up the reflow oven with the correct temperature profile for your specific board and components, as recommended in component datasheets. For a board with hundreds of components, this programming is a meticulous, time-consuming task.
| Assembly NRE Component | Typical Cost Range | Purpose |
|---|---|---|
| Solder Paste Stencil (Framed) | $150 - $600+ | Precisely apply solder paste to pads. |
| PnP Machine Programming | $50 - $500+ | Tell the robot where to place each component. |
| Custom Fixtures/Jigs | $50 - $300 | Hold irregular boards flat during assembly. |
| First Article Inspection (FAI) | $50 - $200 | Formal report verifying correct setup before a full run. |
How Do Different PCB Materials and Finishes Affect NRE Costs?
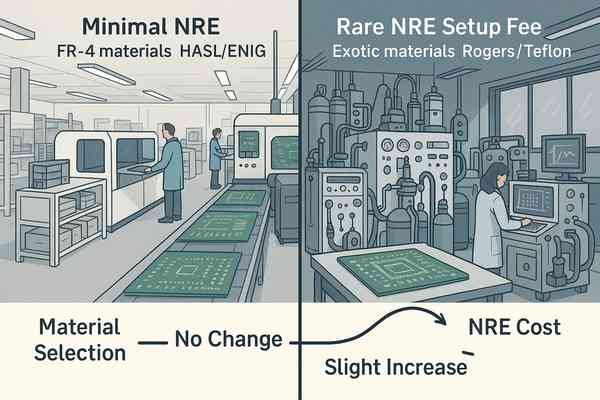
Do exotic materials or special finishes on your PCB increase the one-time NRE cost? While they heavily influence the per-unit price, their direct impact on NRE is often minimal.
Standard materials like FR-4 and common finishes like HASL or ENIG typically do not add to the NRE cost. However, specialized materials (e.g., Rogers, Teflon) or finishes requiring unique processes might incur a small setup fee, though this is rare.
The key takeaway is to separate tooling costs (NRE) from material costs (per-unit). Your board's physical layout dictates the tooling, while your material choice dictates the recurring cost of each board.
Why NRE is Largely Unaffected
The NRE is for creating tools based on your design's geometry. The laser photoplotter drawing the film for your top copper layer doesn't care if that layer will be etched onto standard FR-4 or expensive Rogers 4350B material. The process of creating the film is identical. Similarly, the bed-of-nails fixture is designed to test the electrical connectivity of a specific layout of traces and vias; the underlying dielectric material doesn't change the fixture's design.
When a Small NRE Surcharge Might Apply
There are exceptions. Certain exotic materials may require special handling that justifies a setup fee. For example, some flexible polyimide materials need to be baked in an oven before processing to remove moisture. This extra step might incur a small NRE. Similarly, a very specialized finish that the factory doesn't run daily might require them to clean and set up a dedicated chemical line, a cost they could pass on as a small one-time charge. But for over 95% of designs using common materials, this isn't a factor.
| Feature | Impact on Per-Unit Cost | Impact on NRE Cost |
|---|---|---|
| Material (FR-4 vs. Rogers) | High | None / Very Low |
| Finish (HASL vs. ENIG) | Medium | None |
| Copper Weight (1oz vs. 2oz) | Low-Medium | None |
| Board Complexity (Layers) | High | High (This is the primary driver of fabrication NRE) |
What Is the Impact of Board Complexity on NRE?
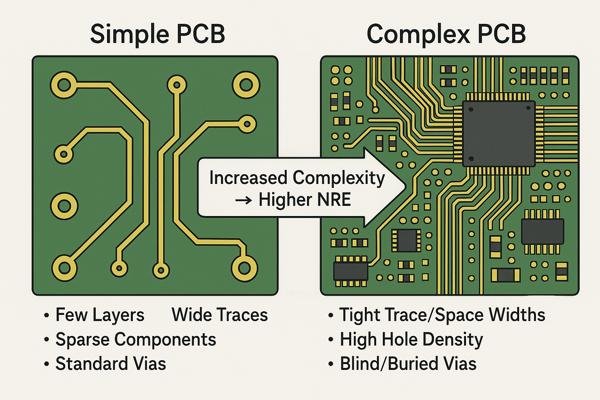
Does a more complex PCB design lead to a higher NRE charge? Absolutely. The more intricate your design, the more setup work is required, which directly increases the one-time costs.
Board complexity, defined by factors like layer count, trace/space width, hole density, and the presence of advanced features like blind/buried vias, significantly increases both fabrication and assembly NRE. More layers mean more phototools, and more components mean more programming time.
Complexity is the single biggest multiplier for NRE costs. Let’s look at how specific features in both fabrication and assembly contribute to this increase.
Fabrication Complexity Drivers
The clearest example of complexity driving NRE is the use of blind or buried vias3. For a board with a blind via from Layer 1 to Layer 2 in an 8-layer stackup, the manufacturer can't just drill partway through. The process, governed by IPC-2226 standards, involves creating a separate "sub-assembly." They laminate and plate just L1-L2, drill the microvia, plate it, and only then laminate this completed 2-layer board to the rest of the stack (L3-L8). This feature adds an entire, separate lamination, drilling, and plating cycle. You are essentially paying the NRE for a "board within a board."
Assembly Complexity Drivers
For assembly, complexity is about component density and difficulty. A board with a few large, easy-to-place connectors is simple. A board with a 600-pin BGA with 0.4mm pitch is not. The fine-pitch BGA requires a more expensive, high-precision stencil and much more careful PnP programming and inspection (possibly requiring X-ray inspection, which also has a setup cost). The sheer number of unique components on the BOM also increases programming time.
| Complexity Factor | Impact on Fab NRE | Impact on Assembly NRE | Reason |
|---|---|---|---|
| Layer Count | High | None | More layers = more films (phototools). |
| Blind/Buried Vias | Very High | None | Requires sequential lamination and multiple drill setups. |
| Component Count/Density | Low | High | Increases PnP programming time and stencil complexity. |
| Fine-Pitch Components | None | High | Requires higher-precision stencils and slower machine setup. |
What Is the Difference Between NRE and the Per-Unit Cost of a PCB?
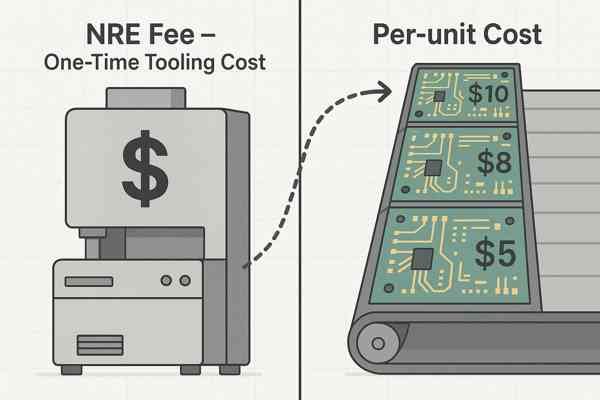
Struggling to see why NRE and per-unit cost are listed separately? One is a fixed, one-time charge, while the other is a variable cost that depends on quantity.
NRE is a fixed, one-time fee to create the necessary tooling for your specific design. The per-unit cost is the price to manufacture each individual PCB, covering materials and labor, and it typically decreases as the production quantity increases.
Thinking about this correctly is fundamental to budgeting for any hardware project, from prototype to mass production. Let's explore the financial impact.
The Fixed vs. Variable Concept
NRE is a classic example of a fixed cost. You pay it once for a specific design revision, regardless of whether you build 5 boards or 5,000. It's the investment needed to get the production line ready. The per-unit cost is a variable cost. It represents the raw materials (laminate, components, solder), electricity, and direct labor required for each board that comes off the line. This cost benefits from economies of scale; buying 10,000 resistors is far cheaper per piece than buying 10.
Calculating the True Cost
The "true" or "effective" cost per board is what you should use for your financial planning. This is calculated by amortizing the fixed NRE cost across the entire production volume and adding it to the variable per-unit cost. The formula is simple but powerful for understanding how volume changes your project's financial viability.
| Cost Component | Nature | Example (100-unit run) | Example (5,000-unit run) |
|---|---|---|---|
| NRE Cost | Fixed | $400 | $400 |
| Per-Unit Cost | Variable | $12.00 | $9.50 |
| Amortized NRE | Derived | $4.00 ($400/100) | $0.08 ($400/5000) |
| True Cost/Unit | Total | $16.00 | $9.58 |
This table clearly shows that for the prototype run, the NRE adds 33% to the cost of each board. For the production run, it adds less than 1%.
How Is NRE Cost Amortized Over the Production Volume?
How does that upfront NRE fee impact your final product cost? You spread it out. Amortizing the NRE is key to understanding the true cost per unit at different volumes.
Amortizing NRE means dividing the total one-time engineering cost by the number of units in a production run. This gives you the NRE cost-per-board, which decreases as the production volume increases. The formula is: Total Cost per Unit = Per-Unit Manufacturing Cost + (Total NRE Cost / Number of Units).
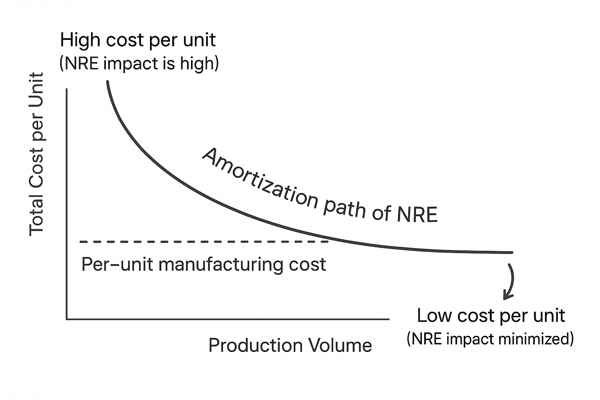
This concept is crucial for making smart business decisions. A product that seems too expensive at the prototype stage can become highly profitable at scale, simply due to amortization.
The Power of Volume
Let's walk through a detailed scenario. I recently worked on an industrial controller project. The initial NREs were significant.
- Fabrication NRE (6-layer board): $350
- Assembly NRE (Stencil + Programming): $250
- Total NRE: $600
- Per-Unit Cost at low volume: $45
For our first prototype run of 10 units, the amortized NRE per board was $600 / 10 = $60. This made the true cost per prototype a staggering $45 + $60 = $105. This price is fine for R&D, but not for a commercial product.
Scaling to Production
However, the plan was always to scale. For the first production run of 1,000 units, the per-unit cost dropped to $38 due to better component pricing. The NRE was already paid. The true cost becomes $38 + ($600 / 1000) = $38 + $0.60 = $38.60. The NRE's impact shrank from $60 to just 60 cents. This illustrates why you should never judge a product's final cost based on the prototype quote.
| Production Volume | Total NRE | Per-Unit Cost | NRE Cost per Unit ($600 / Volume) | True Cost per Unit |
|---|---|---|---|---|
| 10 (Prototype) | $600 | $45.00 | $60.00 | $105.00 |
| 100 (Pilot Run) | $600 | $40.00 | $6.00 | $46.00 |
| 1,000 (Production) | $600 | $38.00 | $0.60 | $38.60 |
| 10,000 (Mass Prod) | $600 | $37.50 | $0.06 | $37.56 |
What Are Effective Strategies for Reducing NRE Costs in PCB Manufacturing?
Want to lower those upfront NRE charges? While some NRE is unavoidable, smart design choices and clear communication with your manufacturer can significantly reduce these one-time costs.
To reduce NRE, simplify your design where possible, use a manufacturer's standard processes and stackups, panelize smaller boards into a single array, and place larger volume orders to make NRE waiver negotiations possible. Consolidating orders can also help.
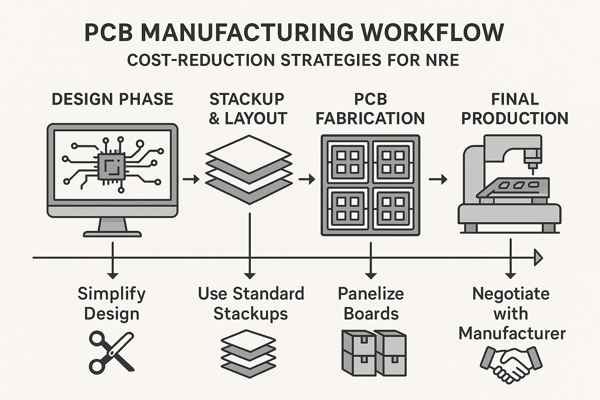
Over my career, I've learned that controlling NRE is about being pragmatic and strategic. It's a mix of smart engineering and smart business.
Design for Manufacturability (DFM)4
This is the most direct technical approach. On a recent project, our first layout was 6 layers with tight 3.5 mil traces to meet a size constraint. The NRE quote was over $1,200. We spent an extra day re-routing and found that by slightly adjusting component placement, we could fit it on a standard 8-layer board using the fab's standard 5 mil trace/space rules. While the per-unit cost for 8 layers was a few dollars higher, the fabrication NRE dropped to just $450. This saved significant upfront capital for the critical prototype phase. Sticking to a manufacturer's standard capabilities is the fastest way to reduce NRE.
Strategic Sourcing and Communication
This is the business side of the equation. If you have several small, unrelated board designs for a project, ask your supplier if they can run them on a multi-project panel. This allows you to share one large fabrication NRE across multiple boards. Most importantly, talk to your sales contact. Be transparent about your volume projections. A manufacturer is a partner. If they believe your 20-piece prototype order is the start of a 20,000-piece annual demand, they have a strong business incentive to invest in you by reducing or waiving the initial NRE.
| Strategy | Impact on NRE | How It Works |
|---|---|---|
| Reduce Layer Count | High | Fewer layers mean fewer phototools (films). |
| Avoid Blind/Buried Vias | High | Eliminates expensive sequential lamination and drill setups. |
| Multi-Project Panel | Medium-High | Combines NRE for several different boards into one. |
| Communicate High Volume | Medium-High | The manufacturer may waive NRE to win a large future order. |
How Does Panelization Affect NRE Charges?
Can putting multiple boards on one panel save you money on NRE? Yes, but only under the right circumstances. It's a great strategy for combining identical boards, but not always for different ones.
Panelization, the process of arranging multiple copies of the same PCB onto a larger manufacturing panel, does not change the NRE. You still pay one NRE for the single design. Combining different designs onto one panel (multi-project panel) can save NRE, but is less common and has limitations.
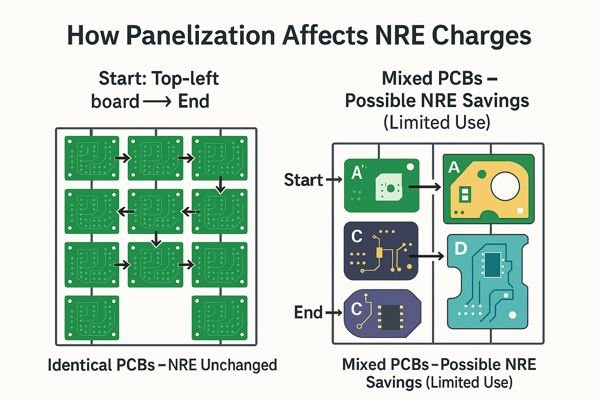
This is a subtle but important distinction. Panelization primarily targets the per-unit cost, not the NRE, but there is one scenario where it can help with NRE.
Standard Panelization (Single Design)
This is the most common form. You have one board design, and you ask the manufacturer to place it in a 2x5 array on a larger panel. In this case, the NRE is unchanged. Why? Because the factory still only needs to create one set of phototools and one test fixture for that single design. The benefit here is in assembly; the pick-and-place machine can process all 10 boards on the panel in one continuous operation, significantly reducing the machine handling time per board and thus lowering your assembly per-unit cost.
Multi-Project Panelization (Multiple Designs)
This is the NRE-saving strategy. However, be aware of the trade-offs. You might be constrained by the "lowest common denominator." For instance, if one board on the panel requires an expensive ENIG finish, all boards on that panel must get the same finish, potentially increasing the per-unit cost of your other, simpler boards. It also complicates logistics, as all boards are produced on the same schedule.
| Panelization Type | How It's Billed | Main Benefit |
|---|---|---|
| Single Design | 1x Fab NRE + 1x Assembly NRE (for the panel) | Lowers per-unit assembly cost. |
| Multi-Project | 1x Fab NRE + 3x Assembly NREs (one per design) | Lowers total fabrication NRE cost. |
Are There Situations Where a Manufacturer Might Waive or Reduce NRE Costs?
Is it possible to get that NRE charge completely removed from your quote? Yes, it happens more often than you might think, especially when you can offer the manufacturer long-term, high-volume business.
Manufacturers may waive or significantly reduce NRE costs for high-volume production orders or for customers with a proven track record of repeat business. They treat it as a marketing expense to secure a valuable long-term contract.
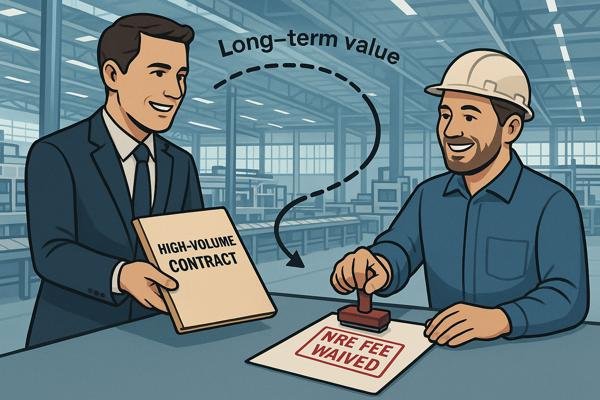
From a manufacturer's perspective, NRE is risk management. It ensures they don't lose money setting up for a small order that never repeats. If you can remove that risk for them, the NRE becomes negotiable.
The Power of the Production Forecast
The most powerful negotiating tool you have is a credible, high-volume production forecast. When I was leading hardware for a new keypad at Honeywell, we projected annual volumes in the tens of thousands. During the RFQ process for prototypes, we shared this forecast with potential suppliers. The conversation changed immediately. The NRE, which was quoted at over $2,000 for the complex 8-layer board, was no longer a sticking point. Multiple vendors offered to waive it entirely. They saw the NRE not as a required fee, but as a small investment to win a contract worth hundreds of thousands of dollars over several years.
Building a Relationship
Loyalty also plays a role. If you have been working with the same manufacturer for years and have a steady stream of projects, they will be much more flexible. They value your continued business and may offer NRE discounts or waivers as a way to reward that loyalty and keep you from shopping around.
| Scenario for Waiver | Manufacturer's Motivation | Your Leverage |
|---|---|---|
| High-Volume Contract | Secure large, profitable, long-term revenue. | A credible production forecast (10k+ units/year). |
| Established Customer | Retain a loyal customer and their future business. | A history of multiple successful projects. |
| Highly Competitive Bid | Win a strategic project against competitors. | Getting quotes from multiple qualified vendors. |
Do Design Revisions Automatically Incur New NRE Charges?
Worried that a small design change will force you to pay the full NRE again? It depends entirely on what you change. A simple component swap is different from re-routing traces.
Any change to the PCB's copper layers, drill files, or board outline will require new fabrication NRE because new phototools and a new test fixture must be created. Changes to the Bill of Materials (BOM) that affect component footprints will require a new assembly NRE for a new stencil.
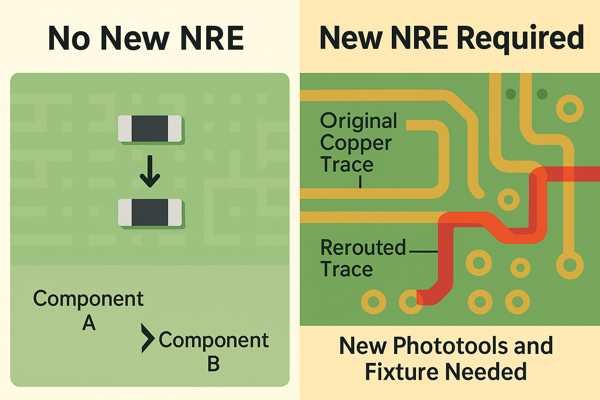
This is a critical financial point in the product lifecycle. A "Rev B" of your board is not free. You must budget for new tooling. Let's break down the triggers for new charges with precision.
Triggers for Fabrication NRE (The Expensive One)
You must pay a new fabrication NRE if you make any change to the physical layout of the bare board. This includes moving a single trace, adjusting a pad size, changing the board outline, adding a mounting hole, or re-spacing components. Why? Because any of these changes makes the original phototools and electrical test fixture obsolete. The manufacturer has to generate a completely new set of films and build a new test fixture from scratch. This is a full reset of the fabrication tooling.
Triggers for Assembly NRE (The Cheaper One)
Assembly NRE is more forgiving. You only need a new stencil if you change a component's land pattern. However, a nuance exists for minor placement changes. If you slightly shift a few components without altering footprints, have a conversation with your assembly house. If you're a good customer, they may agree to simply update the existing PnP program coordinates as a minor, no-charge modification rather than charging a full reprogramming fee. It never hurts to ask.
| Change Made to Design | New Fab NRE? | New Assembly NRE? | Justification |
|---|---|---|---|
| Moved one trace | Yes | No | Copper layout changed, requires new films and E-Test fixture. |
| Changed resistor value (same footprint) | No | No | No physical change to the board or stencil. |
| Changed capacitor footprint (0402 to 0603) | No | Yes | Stencil apertures must be re-cut for the new pad size. |
| Added a new mounting hole | Yes | No | Drill file and board outline changed, requires new tooling. |
Who Holds Ownership of the Tooling and Fixtures Created as Part of the NRE Payment?
You paid for the tooling, so you own it, right? Unfortunately, it's not that simple. In most cases, the manufacturer retains ownership even though you paid for its creation.
The industry standard is that the PCB manufacturer retains ownership of all tooling (photoplots, test fixtures, stencils) created for your project. The NRE fee is a payment for the service of creating and using these tools, not for the physical tools themselves.
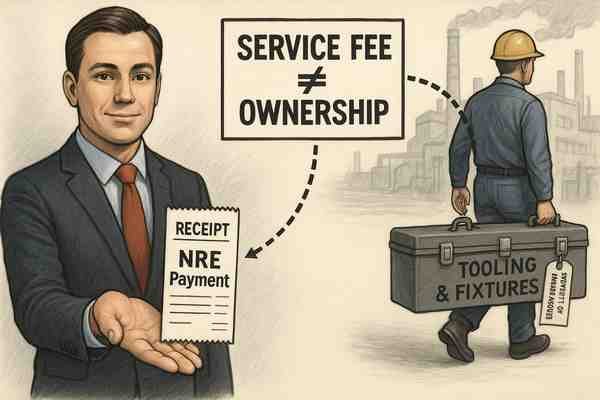
This policy often surprises engineers and project managers. It can feel counterintuitive—you paid a line item for "Tooling," so why can't you take it to another vendor? The reasons are practical and rooted in the manufacturing process itself.
Tooling is Process-Specific
The tools are not universal. A set of phototool films is created with specific alignment marks and tolerances calibrated to Manufacturer A's lamination and imaging equipment. If you were to take those films to Manufacturer B, their machines would likely have different calibration and alignment systems, rendering the films useless. The same is true for a bed-of-nails test fixture; it's mounted on a base and wired to connect to a specific brand and model of test machine. It's not a portable device.
NRE as a 'Setup and Access Fee'
It's more accurate to think of NRE not as purchasing an asset, but as paying a one-time fee for custom setup and the right to access that setup for future orders. You are paying for the engineering time, labor, and materials to create a custom production line for your product within that specific factory. While you don't own the physical tools, your NRE payment should guarantee that the manufacturer will store and maintain them for you, and use them for any subsequent re-orders of the same revision without charge.
| Aspect of NRE | What You Are Paying For | What You Are NOT Paying For |
|---|---|---|
| Service | The engineering time and labor to create the tooling. | The physical tooling as a transferable asset. |
| Access | The right to re-use the tooling for future orders. | The right to move the tooling to another supplier. |
| Maintenance | The manufacturer's cost to store and maintain the tools. | Insurance or ownership rights over the physical items. |
How Do NRE Costs for Prototypes Compare to Those for Mass Production?
Are NRE fees different when you're just making a few boards versus thousands? The NRE itself is usually the same, but the strategy and associated costs can differ significantly.
The NRE charge for a specific design is generally the same regardless of volume. However, for prototypes, manufacturers might use lower-cost, temporary tooling (like soft tooling), while for mass production, they invest in more durable, high-precision tooling (hard tooling) to ensure consistency over large volumes.

While the NRE line item on your quote might look identical for a 10-piece run and a 10,000-piece run, what's happening behind the scenes is quite different. The manufacturer is matching the tooling investment to the scale of the job.
Prototype Tooling ('Soft Tooling')
For a small prototype run, the focus is on speed and minimizing cost. The manufacturer knows this design may change, so they don't invest in highly durable tooling. For electrical testing, they might opt for a "flying probe5" test. This involves a machine that moves probes around to test each net one by one. It's slow per-board, but requires no custom fixture, so the NRE is just programming time. For the assembly stencil, they might use a frameless "proto-stencil," which is cheaper but can't withstand tens of thousands of uses. This approach keeps the initial NRE low.
Production Tooling ('Hard Tooling')
For a mass production order, the focus shifts to reliability, speed, and consistency. The per-unit cost must be minimal. Here, the manufacturer invests in robust "hard tooling." They will build a dedicated bed-of-nails fixture that can test an entire panel in seconds. They will procure a heavy-duty, framed stencil designed for high-volume, repeatable performance. The upfront cost for the manufacturer to create this hard tooling is significantly higher than for soft tooling, but this investment is what enables the high-speed, low-cost production required for scale. The NRE you pay is often a blended cost that allows them to cover either scenario.
| Tooling Type | Typical Use Case | Key Characteristic | NRE Impact |
|---|---|---|---|
| Soft Tooling | Prototypes (5-50 units) | Low durability, flexible, low initial cost. | Keeps prototype NRE as low as possible. |
| Hard Tooling | Production (1k+ units) | High durability, high speed, high initial cost. | The higher internal cost is absorbed by the manufacturer. |
Conclusion
NRE costs are a fundamental part of PCB manufacturing. They cover the essential, one-time setup for your specific design and while they can seem high for prototypes, their cost becomes minimal when amortized over a large production run.
-
Understanding photolithography is crucial for mastering the fabrication of high-precision components. ↩
-
Exploring BOM will enhance your knowledge of component management in assembly processes. ↩
-
Understanding blind or buried vias is crucial for grasping PCB complexity and its impact on costs. ↩
-
Understanding DFM can significantly enhance your product design process, ensuring cost-effectiveness and efficiency in manufacturing. ↩
-
Explore this link to understand how flying probe testing enhances efficiency in prototype testing without the need for custom fixtures. ↩


